Allergy Friendly Aquafaba Baked Alaskas
Oh yes, aquafaba baked Alaskas are egg free, nut free, and allergy friendly thanks to some miracle bean juice whipped into a cloudlike meringue!
Ingredients
- 1 13x9 chocolate wacky cake
- 6 cups strawberry ice cream store-bought or homemade
- 1 can garbanzo or white bean no salt preferred, refrigerate, reserve beans for other uses
- 3/4 cup powdered sugar
- 1 teaspoon Rodelle vanilla extract
- 2 teaspoons Rodelle lemon extract or lemon juice
- 1 teaspoon cream of tartar
Instructions
-
Cut the cake into 12 squares, brush off the crumbs, and place on a parchment lined baking tray.
-
Wrap the baking tray with plastic wrap and freeze the tray for at least 1-2 hours until the cakes are cold.
-
Add one rounded scoop of ice cream on top of the frozen cakes and gently press into the cake so that the ice cream doesn't slide off.
-
Wrap the baking tray again and freeze the ice cream cakes for at least 1-2 hours until frozen solid.
-
Set a strainer over a large mixing bowl and pour the can of beans into the strainer, allow the bean juice to drain for a few minutes and set aside the beans for another use.
-
Use an electric mixer to whip the bean juice on high for about 8-10 minutes until it turns into a white stiff meringue.
-
Add powdered sugar, vanilla extract, lemon extract or lemon juice, and cream of tartar, and whip for another minute until stiff.
-
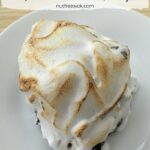
Take the ice cream cakes out of the freezer, spread them out so that you have room in between the cakes to work, and scoop about 1/2 cup of the aquafaba onto each cake and use an offset spatula to spread the aquafaba over the entire ice cream cake. Don't make the aquafaba smooth as the final dessert looks better with some swirls and texture.
-
Wrap and freeze the aquafaba covered ice cream cakes for 1-2 hours until the aquafaba is frozen.
-
When ready to brown in the oven: preheat the oven at 450°F, place the baking tray on a middle rack for 4-5 minutes. Watch them carefully and take them out as soon as the meringue browns around the edges.
-
OR When ready to brown under a broiler: set your oven rack so that the tops of the dessert will be at least 4 inches away from the broiler element. Take your ice cream cakes out so they can thaw slightly and preheat your broiler for 3 minutes. Place the tray of ice cream cakes into the oven and with the door open, watch them brown for 60-90 seconds with your oven mitts on until the aquafaba baked Alaskas are nicely browned and toasted.
-
OR When ready to use a torch: Take aquafaba covered ice cream cakes out of the freezer and then use your torch to brown the aquafaba. I recommend working in small batches, transfer 2-4 aquafaba covered ice cream cakes onto your dessert plates, and returning the rest into the freezer until you're ready for your next batch.
Recipe Notes
You can further adapt this recipe to be free of the top 8 or 9 allergens by making a gluten free, top 9 allergen free cake in a 13x9 baking dish and using a dairy free, allergy safe frozen scoopable dessert.
Link to chocolate cake recipe: https://nutfreewok.com/chocolate-wacky-cake/
Link to no churn strawberry ice cream recipe: https://nutfreewok.com/strawberry-ice-cream-no-churn/