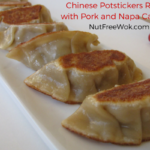
Chinese Potstickers Recipe: Pork & Napa Cabbage
Ingredients
- 4 oz napa cabbage leaves approximately 6 leaves
- 1/2 teaspoon salt
- 1/2 pound ground pork
- 1 scallion chopped
- 2 teaspoons soy sauce
- 1 teaspoon oyster sauce
- 1 teaspoon sesame oil
- 1/2 teaspoon garlic powder or 1 clove minced garlic
- 1/4 teaspoon sugar
- 1/8 teaspoon white pepper or black pepper
- 1 teaspoon cornstarch
- 22 potsticker wrappers have a few extras just in case
- 1 teaspoon oil whatever is safe for you, I like olive oil
- Nonstick cooking spray optional
- 1/3 cup hot water more might be needed
- White vinegar or dipping sauce for serving see notes below
Instructions
Make the filling
-
Wash, dry, and finely chop napa cabbage (I like to stack them, cut the stem into 1/4 inch strips and then chop).
-
Add the chopped napa cabbage into a medium bowl, add salt and mix, set aside for 10 minutes.
-
Place ground pork into a large mixing bowl and add chopped scallions, soy sauce, oyster sauce, sesame oil, garlic, sugar, and white pepper and mix.
-
Add cornstarch to the pork mixture and mix.
-
Grab small handfuls of napa cabbage and squeeze out the excess liquid, add the napa cabbage to the pork mixture, and mix evenly (discard the salty napa cabbage liquid).
Assemble potstickers (refer to the blog post for details)
-
Place a wrapper on a clean dry surface and add 1 tablespoon of filling in the center, give the meat a tiny squeeze between two spoons to give it an oval potsticker shape.
-
Dip a finger into a bowl of water and wet the edge of the wrapper, and then pleat to seal:
-
Think of the wrapper as a clock face, start at about 10 o'clock, make a small pleat and pinch, repeat 5-6 times and fold the bottom flap up.
-
Gently check the shape and pleats to make sure the edges are sealed (see video for a demonstration).
-
Inspect the pleats and gently pinch the entire seal so that loose pleats and corners are sealed.
Pan fry the potstickers
-
Heat up a large frying pan on medium high heat (be sure that whatever pan you use that it has a matching lid), I use a 14 inch stainless steel heavy frying pan.
-
When the frying pan is hot and drop of water sizzles and dances on the frying pan, add oil and swirl, add non-stick cooking spray if desired (optional).
-
Quickly arrange the potstickers in the frying pan and pan fry for about 3-4 minutes until the bottoms are golden brown.
-
Have a lid in one hand and use your other hand to add the hot water to the frying pan, the water will sizzle and steam, immediately cover the frying pan with the lid to steam the potstickers.
-
Do not lift the lid to allow the dumplings to steam for 6 minutes on medium heat.
-
Check for doneness, if the potsticker skins are still slightly opaque, add 2 tablespoons of hot water, cover, and steam for another 2 minutes (definitely do this step if cooking frozen potstickers)
-
When the potsticker skins are no longer opaque and are slightly translucent, remove the lid and cook for another minute to allow the potsticker bottoms to become crisp and serve with white vinegar or a soy-vinegar dipping sauce (see notes below).
Recipe Notes
I like dipping my potstickers in white vinegar or Chinese red vinegar on the side. Otherwise, I would serve guests a dipping sauce from 2 tablespoons each of rice vinegar and soy sauce, 2 tablespoons of chopped scallions, 1 teaspoon each of sugar and grated or julienne ginger.
WHEN COOKING FROZEN POTSTICKERS: do not thaw but allow extra cooking time by adding more hot water at step 17.
Approximately 52 calories each