


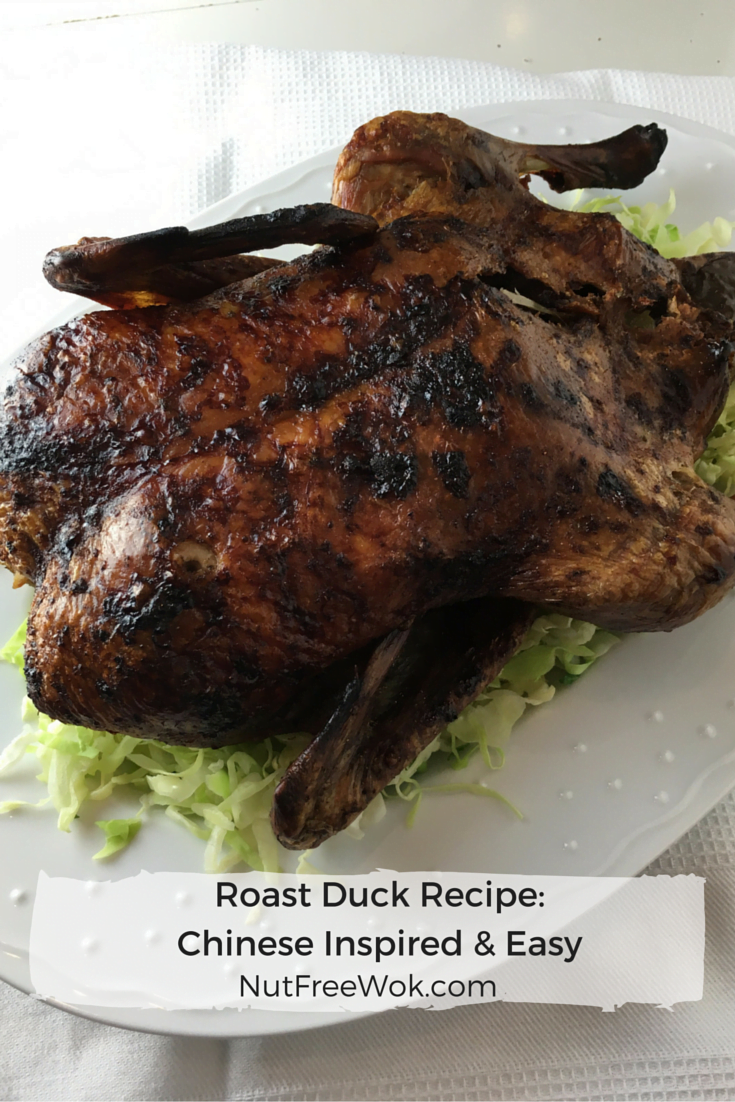
Roast Duck Recipe: Chinese Inspired & Easy
I’ve been working on developing a Roast Duck Recipe for years and I’ve finally settled on recipe that our family loves: it’s meaty, juicy, tender, with hints of citrus, aromatics, and spices infused into almost every bite. My roast duck recipe is Chinese inspired but the method and ingredients are simplified.
I love Chinese roast duck, especially the ones from a Chinese BBQ take out counter. One can walk down almost any street in San Francisco’s Chinatown and see whole roasted ducks hanging in the display window. Place your order and the guy behind the counter would expertly chop the duck into 2 inch sized pieces and place them in a take out box to be enjoyed at home. Usually there are a few really good pieces such as the thighs and the breasts pieces. But sometimes there could be a lot of skin, bones, and overcooked dried meat. Sometimes the drumstick tastes like duck jerky on a bone.
Because we live in the suburbs of San Francisco, it’s a little bit difficult to buy really good roast duck. I spent years feeling deprived of roast duck because I worried about hidden allergens and cross contact. It’s a bit intimidating to ask a grumpy person holding a cleaver questions about peanut oil so I opted to make my own roast duck.
I’ve tried a lot of recipes that involved steps such as air chilling the duck for 1-4 days, separating the skin from the flesh by using a pump, and/or shrinking the skin with boiling hot solution of maltose and water. Some recipes call for steaming the duck for 30 minutes first, some suggest boiling the duck for 30 minutes first, some recipes call for roasting at 200°F for 5 hours and some at 400°F for 1 hour. In other words many Chinese roast duck recipes are all over the place, which leaves lots room for error as well as allowances for personal preferences.
The only time that I’ve ever tasted homemade roast duck that taste exactly like the ones from a Chinese BBQ takeout was at my friend’s parents’ house. Her dad built his own huge outdoor gas oven in which he could hang and roast a few ducks at high temperature. I have come to the conclusion that a combination of air-chilling for a couple of days, tightening the skin with hot maltose water, and the ability to roast a duck vertically at a high temperature may be keys to achieving the desired crispy skin.
To be totally realistic, I don’t eat duck skin and it just doesn’t make sense for me to go through so many steps to roast a duck with crispy skin. I want flavorful, juicy, and tender morsels of roasted duck meat and that’s what this recipe is all about. My recipe for roast duck is inspired by Chinese flavors: 5 spice, ginger, garlic, scallions, and a hint of citrus from tangerine peels. Best of all, my recipe is optimized to save time and effort and to maximize flavor. If you have any leftover duck, try making pizza with it (see my recipe for Smoked Duck with Hoisin Sauce Pizza).
Roasting Tips:
- Write down the weight of your duck before you throw away the wrapper. You will need the weight to calculate the length of time it takes to roast your duck. Roast your duck at 375°F for 22 minutes per pound (multiply the number of pounds by 22).
- Then divide the total number of minutes by two to calculate the halfway point and when you will flip your duck over. Round to the nearest 5 minutes but be sure that the times add up to the total roasting time. For example, if my duck is 5.7 pounds, then the total amount of time it takes to roast the duck is 125 minutes. I can flip the duck after 1 hour and then continue roasting for an additional 1 hour and 5 minutes.
- Your total cooking time will vary if you cook other foods in the oven at the same time or if you open and close the oven door a lot while the duck is roasting.
- When prepping the duck, do not be tempted to cut off the excess skin around the neck. Leave it on to prevent the duck breast from drying out.
- Preheat the oven at 400°F to account for the drop in temperature from opening the door and placing a cold duck in the oven. Change the oven temperature to 375°F as soon as the duck is in the oven.
- Clean up is way easier if you line a fresh clean 13×9 baking dish with foil.
- Elevate your duck so it will not sit in the fat that renders out during the roasting process. I’ve tried using roasting racks but they leave unsightly indentations on the duck. I love my genius hack of making foil logs.
- Add a cup of hot water to your baking dish before you start roasting to prevent excessive splatters which can lead to a giant mess in your oven and/or setting off your smoke detector.
- Be safe: never add cold water to a hot dish and place your baking dish on a rimmed baking pan so that it’s easier to handle.
- Keep an eye on your duck during the last 15-20 minutes. If it seems like the skin on the duck breast is browning too fast, loosely place a piece of foil on the duck.
- Whenever I make one roast duck for dinner, we never have leftovers, maybe a few bony pieces. One time I roasted two ducks and it was just right with a modest amount of leftovers for another meal. Try this recipe, you might find you need to make a double recipe also.
This recipe as written is peanut, tree nut, fish, shellfish, egg, and dairy free with options to make it gluten free or top 8 free.
- Hoisin sauce almost always has soy as an ingredient and sometimes it has wheat too.
- If you are wheat/gluten free, look for gluten free hoisin sauce, such as Wok Mei brand (affiliate link).
- If you are cooking this for someone with a soy allergy, I would recommend omitting the honey and hoisin sauce altogether and using a dry rub with 1 tablespoon salt, 2 tablespoons sugar, 2 teaspoons 5 spice, and 1/2 teaspoon pepper.
- Citrus peels: Traditional Chinese cooking uses dried tangerine peels but one whole fresh tangerine peel is a suitable alternative. We usually have Cuties at our house (need two) and I use that instead. One time I didn’t have any Cuties at home and I thinly peeled the zest layer off one orange and that worked just as well.
- If you need help sourcing ingredients, be sure to check what’s in my cupboard. I used Spicely Chinese 5 Spice & White Pepper and Koon Chun Hoisin Sauce (affiliate links) for this recipe.
- For directions on how to chop the duck into bite sized pieces, see my recipe for “White Cut Chicken.”
Roast Duck Recipe: Chinese Inspired & Simplified
Ingredients
- 1 duck approximately 5 to 6 pounds
- 3 tablespoons hoisin sauce
- 2 tablespoons honey
- 1 tablespoon salt
- 2 teaspoons 5 spice powder
- 1/2 teaspoon white pepper or black pepper
- 2 scallions
- 2 small mandarin peels washed and chopped (reserve tangerine for other uses)
- 1 inch section of ginger about thumb sized, peeled and sliced
- 4 cloves garlic
- 1 tablespoon oil I use olive oil.
Instructions
-
If frozen, defrost the duck in a large container in your refrigerator for 2-3 days, write down the weight of the duck.
-
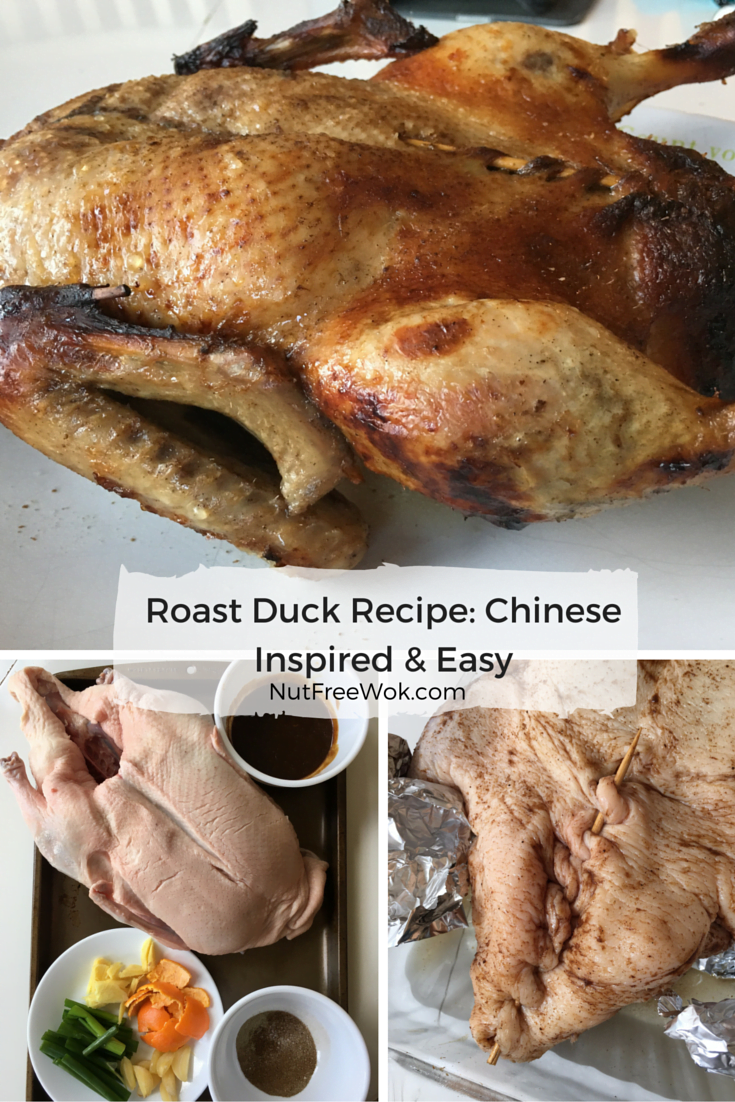
THE DAY BEFORE (or at least 6-8 hours before) you want to roast the duck, prepare the duck by taking out the gizzards, other parts, pouches of sauce, any plastic ties that might be inside the duck.
-
Rinse the duck inside and out and remove anything you don't want to eat (sometimes there might be a yellow film on the skin, you can rub the duck skin with salt to give it a "facial" and rinse).
-
Drain the duck in a colander and pat dry with paper towels.
-
Combine hoisin sauce, honey, salt, 5 spice powder, and pepper in a small bowl.
-
Place the duck in a 13x9 baking dish or other similar sized oven proof container and spoon half the marinade into the duck cavity and rub it around, stuff the duck cavity with scallions, tangerine peels, ginger, and garlic and use a skewer to "sew" the cavity shut.
-
Rub the outside of the duck with half the marinade and then 1 tablespoon oil.
-
Loosely cover with plastic wrap and refrigerate for a few hours or overnight, turn the duck over at least once.
-
APPROXIMATELY 3.5 HOURS before you want to eat, take the duck out of the refrigerator for 30 minutes and preheat your oven to 400°F (note that there will be a temperature change later).
-
While you are waiting, calculate your total cooking time, halfway point, and end time per instructions on the blog or in the notes below.
-
If you want quick clean up, transfer the duck to a clean and foil lined 13x9 baking dish (optional).
-
Crumple two large pieces of aluminum foil so you create two foil logs approximately 1.5 inches thick and 9 inches long and place them under your duck (breast side down) so that your duck is not resting on the baking dish.
-
Spray 4 pieces of foil (approximately 5x5 inches) with non-stick cooking spray and wrap each drumstick and each wing with foil.
-
Place your baking dish on a rimmed baking sheet if you have one (optional).
-
Add 1 cup hot water in the baking dish, place the baking dish on a rimmed baking sheet place the roast duck in the oven and change the oven temperature to 375°F.
-
At the halfway point, take the duck out of the oven and use a few paper towels in both hands to grab the duck by the foil covered drumsticks and flip the duck over and continue roasting your duck.
-
When your duck has roasted approximately 2 hours (give or take a few minutes depending on the size), take the duck out of the oven, and allow it to rest a few minutes.
-
When it's not too hot to handle, transfer the duck to a serving platter, and let it rest for 30 minutes.
-
You can either carve the duck like a turkey (easier if the duck is still too hot after 30 minutes of resting) or transfer it to a cutting board and chop it up into 2 inch pieces (see recipe for "bak cheet gay" for detailed instructions).
Recipe Notes
1) Roast your duck at 375°F for 22 minutes per pound. Write down the weight of your duck before you throw away your wrapper because you'll need it to calculate the length of time it takes to roast your duck by multiplying the number of pound by 22.
2) Then divide the total number of minutes by two to calculate the halfway point and when you will flip your duck over. Round to the nearest 5 minutes but be sure that the times add up to the total roasting time.
3) For example, if my duck is 5.7 pounds, then the total amount of time it takes to roast the duck is 125 minutes. I can flip the duck after 1 hour and then continue roasting for an additional 1 hour and 5 minutes.
Stay tuned for a recipe on how to make steamed Chinese buns so you can enjoy this roast duck “Peking duck” style…
Please help me out!
The best way to see every post or recipe is to subscribe to Nut Free Wok’s email subscription (be sure to respond to the confirmation email). You will to be notified by email next time I publish another post or recipe and I won’t send you spam or share you email with anyone.
If you enjoyed this post, please use the social media buttons below to share with others. I am on Facebook, Twitter, Pinterest, and Instagram as @nutfreewok and it’s great to chat and interact on social media too.
Disclosure/Disclaimer:
I may mention the names of stores and/or brand names of products that I use and think may be helpful to readers, all opinions are my own. Please note that manufacturing practices and ingredients can change at anytime without notice and readers are always responsible for assuring allergen safety before buying or consuming foods. NutFreeWok.com is a participant in the Amazon Services LLC Associates Program, an affiliate advertising program designed to provide a means for sites to earn advertising fees by advertising and linking to Amazon.com.

")


Leave a Reply