


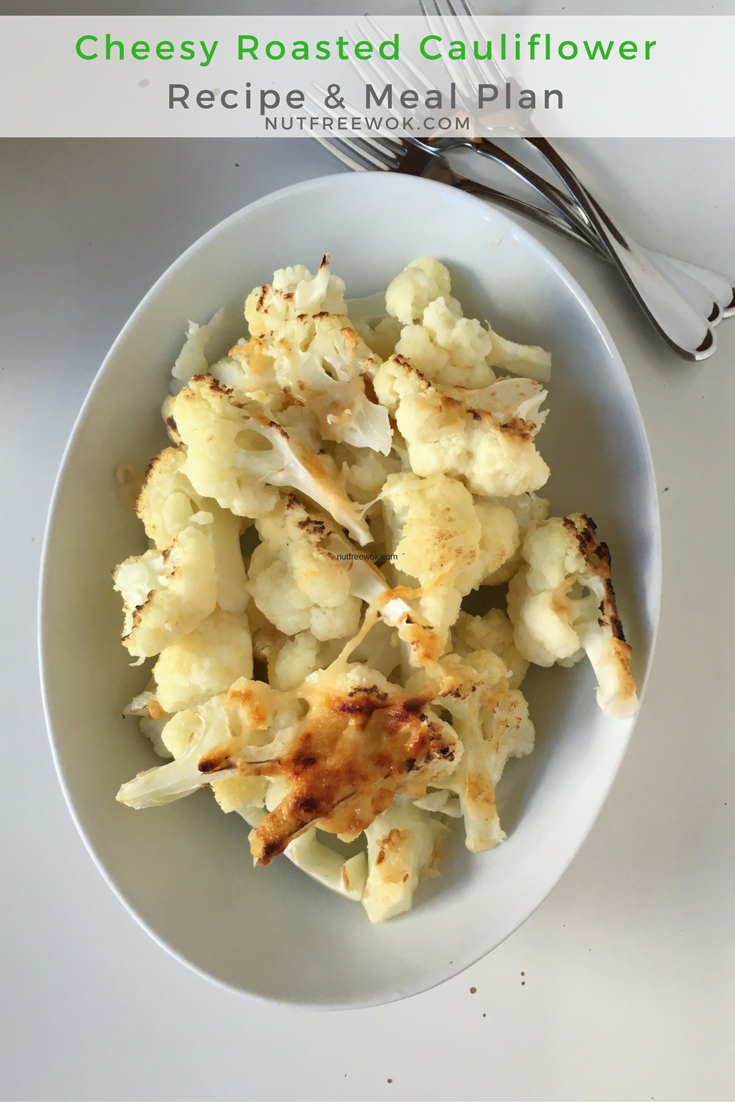
Cheesy roasted cauliflower is an easy, kid approved healthy vegetable side dish for when you need to make a meal in a hurry. Read on for step by step instructions on how to roast cauliflower, make chicken teriyaki, and garlic noodles in less than 45 minutes.
This post was updated on November 21, 2023 with minor updates.
Disclaimer: Please check that all ingredients are suitable for your allergies and be sure to ask your medical care team regarding any allergy related questions (I do not share medical advice). As an Amazon Associate I earn from qualifying purchases.
Roasted Cauliflower Recipe, Perfect for Busy Weeknights
The reason why I am sharing this ridiculously simple cheesy roasted cauliflower recipe is because it’s part of a three course meal that I made in 45 minutes on a busy weeknight. I’m often driving around in the afternoon to buy groceries and pick up my son at 5:30 but need to have dinner ready by 6:30 pm to meet my other son’s needs. So I’m sharing my meal prep plan along with this easy cheesy roasted cauliflower recipe, read on…
Longing for Cantonese Style Cauliflower…
I don’t think that cauliflower is an Asian vegetable but my parents used to make one of my favorite dishes: cauliflower with roasted pork. They first blanch the cauliflower and stir fry some leftover roasted pork that’s carmelized with a little bit of soy sauce and sugar and then combine the cauliflower with the roasted pork. I don’t know if that’s a Cantonese dish or a fusion of traditional Chinese roasted meat with an American produce. I’ll just put that out there and am curious to know what readers think or if their families made this dish too.
I really love cauliflower with roasted pork but it’s a time consuming dish to make as it involves using two pots (one to blanch and the other to stir fry) and making a trip to a buy roasted pork. I would also rather forgo eating roasted pork instead of facing a cleaver wielding man who is yelling “there are no peanuts in roasted pork!!!” As a new mom, I had to figure out a way to intice my children to eat their veggies and roasting cauliflower brings out the natural sweetness plus a sprinkle of cheese seals the deal.
Roasted Cauliflower in a Hurry
Instead, I like a no-fuss quick and easy cauliflower dish that I can prepare in just a few minutes and is ready by the time I’m done setting the table. I make this kid approved dish regularly.
I check that the cauliflower is free of blemishes and use a paring knife to trim off any brown spots, then I remove the leaves. You can get the most out of your head of cauliflower by using a paring knife to cut the stems vertically and then use your knife to split the floret the rest of the way. If you cut through the florets, you’ll have a lot of little cauliflower pieces.
This recipe as written is free of peanuts, tree nuts, soy, dairy, egg, fish, shellfish, and wheat.
If you are dairy-free, there are many kinds of non-dairy cheese substitutes that melts well. What are you favorite brands and flavors? I would love to know your recommendations. One of our friends likes Daiya cheese as a dairy free option. My mom doesn’t like cheese very much but she’s not allergic to it, so I would omit cheese on a portion of the cauliflower and be sure to add some garlic powder for flavor.
Roasted Cauliflower with Cheese Recipe
Cheesy roasted cauliflower is an easy, kid approved healthy vegetable side dish for when you need to make a meal in a hurry. This is an easy side dish, it takes minutes to prep with very little hands-on cooking time.
Ingredients
- 1 medium head of cauliflower 5-6 inches diameter
- 1/4 cup cheddar cheese, shredded
- 1/2 teaspoon garlic powder optional
Instructions
-
Wash and trim cauliflower into bite sized pieces (cut from the stems to keep the florets intact).
-
Place the florets on a parchment paper or foil lined baking sheet lined and sprinkle with cheese (and garlic if using)
-
Set a rack in the oven about 4 inches from your broiler (second from the top) and roast on high for 5-6 minutes for tender crisp cauliflower (if you like your cauliflower softer, move the tray to a lower rack and broil for a few more minutes).
-
Because the floret sizes can vary, you know that the cauliflower is ready when the cheese melts and the cauliflower has touches of brownness.
Recipe Notes
Recipe variatons: Instead of shredded cheddar, you can use other kinds of cheese as well. I like it with parmesean, asiago, spicy jack, etc.. Whatever cheese you like to eat will taste good with this cauliflower recipe.
How to Make All Three Dishes at the Same Time
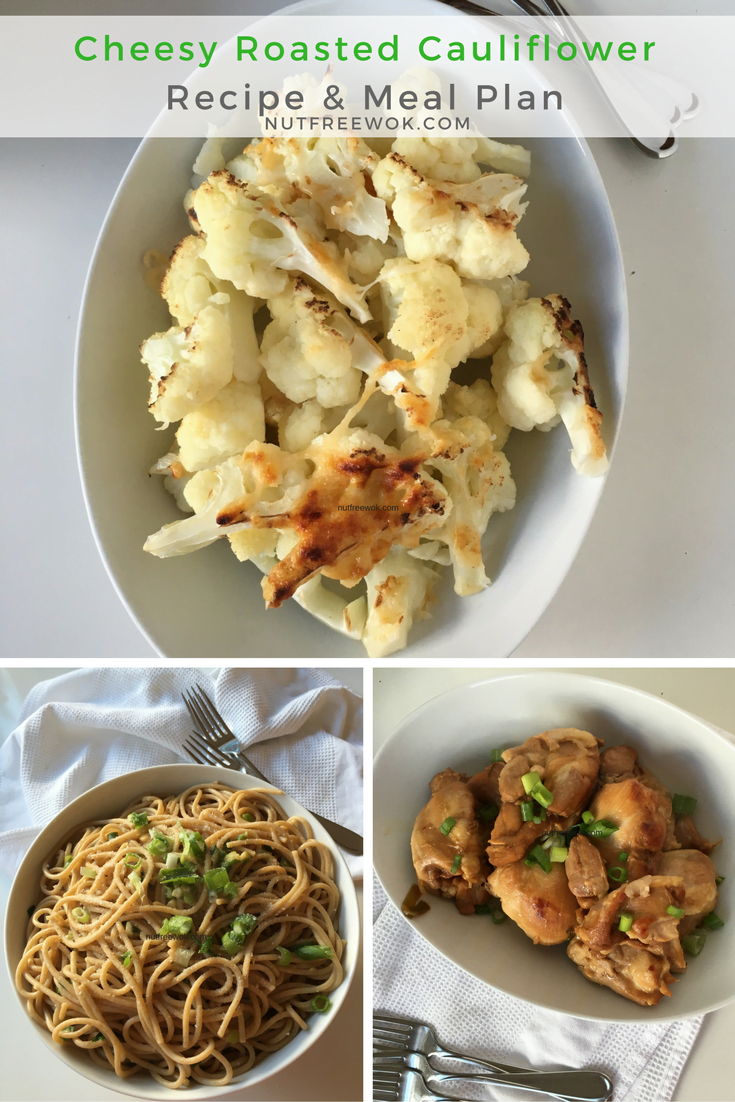
I made Garlic Noodles, Instant Pot Chicken Thighs with Teriyaki Sauce, and Roasted Cauliflower with Cheese in about 45 minutes. All three recipes are peanut, tree nut, egg, shellfish, and fish free. Each of the individual recipes contain suggestions on how to adapt the recipes to be free of wheat, soy, and milk as needed.
Before I had an Instant Pot, I could make this meal by following the Broiled Teriyaki Chicken Thighs recipe in about the same amount of time, but since the chicken can go from perfect to burnt in mere seconds under a broiler, the Instant Pot requires less attention. This meal prep plan took me about 45 minutes from start to finish, your time may vary due to multiple factors.
If you have made these three recipes before then the meal plan will be a breeze. If not, then try making each of these recipes separately along with some familiar dishes. For example, make a salad and cook rice in a rice cooker and give your full attention to making the Instant Pot chicken. Another time you can make your own favorite pasta entree with cheesy roasted cauliflower as a side.
45 Minute (or so) Meal Prep Plan
- Marinate the chicken thighs in the Instant Pot liner, use a fork to poke the meat as mix the meat with the marinade, set aside for 5 minutes (set a timer).
- Boil water in a large stock pot on high heat for the pasta.
- Mince garlic and chop scallion, add some to the chicken (stir and poke some more) and save the rest of the garlic and scallions for the noodles.
- Cook pasta according to instructions on the package (set a timer, usually 6-7 minutes for regular pasta, 10-11 minutes for whole wheat)
- Place the Instant Pot liner into the Instant Pot and set the machine to cook on low pressure, meat setting for 8 minutes.
- When the pasta is ready, save about 1 cup of the starchy pasta water, drain the pasta in a colander but do not rinse. Add oil to the stock pot and sautee the garlic and scallions, add pasta, and season according to the garlic noodle recipe. Add pasta water as needed.
- Wash and trim cauliflower and place in a 9×9 baking dish (time-saver for serving because you don’t have to transfer the veggies to a serving dish) or small foil lined rimmed baking sheet (time-saver for clean up) and sprinkle with cheese.
- Broil cauliflower, set a timer for 5 minutes (check at 4 minutes, the cauliflower is ready when the cheese is melted).
- While the cauliflower is roasting in the oven, release the Instant Pot, stir the chicken, let it rest. Transfer the pasta to a serving platter. Stir the chicken again and transfer the chicken with some sauce into a serving bowl and set the table. Enjoy!
Thanks for reading, please help Nut Free Wok!
If you like this post or recipe, please be sure to give a 5 star rating, leave a comment, and share this post! Your support means a lot to me.
Subscribe to Nut Free Wok’s email subscription (be sure to respond to the confirmation email). You will be notified by email next time I publish another post or recipe and I won’t send you spam or share your email address with anyone.
Disclosure/Disclaimer:
I may mention the names of stores and/or brand names of products that I use because readers ask and I share products and sources which I use and think may be helpful to readers, all opinions are my own. Please note that manufacturing practices and ingredients can change at anytime without notice and readers are always responsible for assuring allergen safety before buying or consuming foods. NutFreeWok.com is a participant in the Amazon Services LLC Associates Program, an affiliate advertising program designed to provide a means for sites to earn advertising fees by advertising and linking to Amazon.com. Thank you for reading!
 Recipe")


I LOVE cauliflower. I definitely need to cook up some soon. Maybe I’ll add a little nutritional yeast to give the cheesy flavor without the actual cheese.
Jen, that’s a great idea to use nutritional yeast! I love cauliflower too. Did you try the cauliflower recipe in my cookbook? I need to share a stovetop version of that recipe for you to try.