


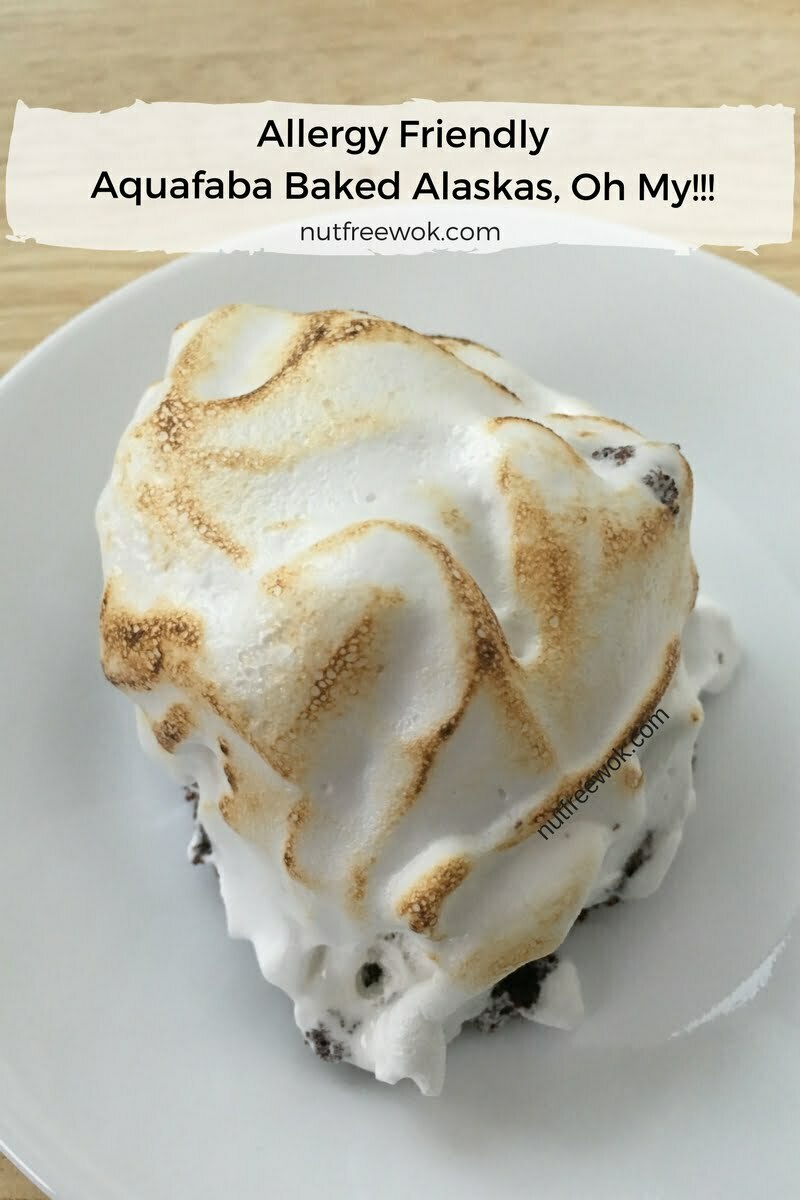
Oh yes, aquafaba baked Alaskas are nut-free and egg-free thanks to some miracle bean juice whipped into a cloudlike meringue! My kids love this dessert because they find it fascinating that I put ice cream in the oven. 😉
Update 2/2/2023: I made some minor edits to this post and added an update regarding Rodelle’s products below.
Disclaimer: I am a brand ambassador for Rodelle and receive products to use and review. Please check that all ingredients are suitable for your allergies and be sure to ask your medical care team regarding any allergy related questions (I do not share medical advice). As an Amazon Associate I earn from qualifying purchases.
Baked Alaskas are a Spectacular Dessert
These individual sized Aquafaba Baked Alaskas will open up a new world of dessert options for nut- and egg-allergic people. Baked Alaskas are an ice cream caked covered with an egg meringue and making it with aquafaba, a frothy meringue-like mixture made from the liquid of a can of chickpeas or white beans makes the dessert egg-free.
I thought about why I love baked Alaska so much and realized that the first few times I experienced a baked Alaska involved some handsome singing men each carrying a baked Alaska that’s on fire at the end of the last dinner of a wonderful cruise vacation.
Those are such wonderful memories and I want to share them with my family and you. You can make an allergy friendly nut free, egg free aquafaba baked Alaska at home. The flames are optional but you’ll have to provide your own handsome singers.
Allergy Friendly Aquafaba Baked Alaskas Love
Baked Alaska is basically a full sized ice cream cake coated with an egg based meringue and then browned and carmelized in a hot oven or with a kitchen torch. Technically the variation I had on cruises is called a Bombe Alaska in which one pours some rum over the dessert and then burn off the alcohol. But either way, the results are the same, an ice cream cake coated with a carmelized fluffy cloud of meringue.
Usually a baked Alaska is a full sized cake and looks so impressive when presented. But I think that after a full sized baked Alaska is cut and served, the individual slices are messy and unpredictable to serve. Instead I love to make small cake rounds or squares, top with a scoop of ice cream, cover with aquafaba fabulousness, and then baked, broiled, or torched as a final touch.
People with food allergies already miss out on so much, but if I can up the wow factor, I put in the extra effort to make them feel special. Each person enjoys their own beautiful aquafaba baked Alaskas.
Wanted: Egg-free Meringue
I’ve made a baked Alaska with an egg meringue in an effort to introduce eggs into my son’s diet. The dessert was amazing, my kids couldn’t believe I was putting ice cream into the oven and the ice cream doesn’t melt. However, I felt conflicted about whether a baked Alaska has too much eggs for my son who had barely passed an egg challenge and perhaps too undercooked for any of us to eat so I stopped making them.
In 2016 I started hearing about people using aquafaba as an egg replacer and the first thing I wanted to make was an egg-free aquafaba baked Alaskass that is allergy friendly and food safe for us to eat. There are lots of reasons to get excited about making this recipe.
Prep Tips
The first thing you have to do is make room in your freezer! You will need to be able to put a baking sheet in your freezer with about 4-5 inches of clearance on a stable surface. The cake base, scoop of ice cream, and aquafaba layer makes for a tall dessert.
The Base: Chocolate Wacky Cake
I make a chocolate cake base and to reduce the complexity of this recipe, I make a chocolate wacky cake. Chocolate wacky cake is easy, nut, milk, and egg free, tastes great and super chocolatey when I use Rodelle’s Baking Cocoa for this recipe.
It’s important to bake the wacky cake in a 13×9 baking dish instead of a 9×9 dish for two reasons. 1) you’ll be able to cut out more cake rounds which mean more aquafaba baked Alaskas. 2) A thin cake base in a baked Alaska will soften and be ready to eat before the ice cream starts to melt.
This recipe is so versatile, you can easily make up to 12 aquafaba baked Alaskas from one 13×9 baking dish. If you need to have 12, than cut the cake into squares. If you want to be fancy and have 3 inch cookie cutters, you can cut out rounds but you might end up with 8-9 round cakes.
If you don’t happen to like chocolate cake, you could also make a vanilla or lemon wacky cake, just bake it in a 13×9 baking dish (affiliate link).
The Ice Cream Layer: Strawberry Ice Cream
Baked Alaska is usually made with strawberry ice cream, so I made a batch of no churn strawberry ice cream because it’s so easy and saves me time and space since I don’t have to pre-freeze my ice cream maker bowl.
This is the best layer and most versatile to adapt to your allergy needs and personal preferences. You can use any ice cream or any scoopable non-dairy frozen dessert that works for your allergies and the ice cream flavor goes with your cake base. Or you can make your own such as vanilla ice cream or peaches and cream ice cream. If you live in Northern California, you might be able to buy strawberry ice cream made by Straus, which is a local nut-free brand (not egg-free).
Aquafaba Magic and Final Assembly
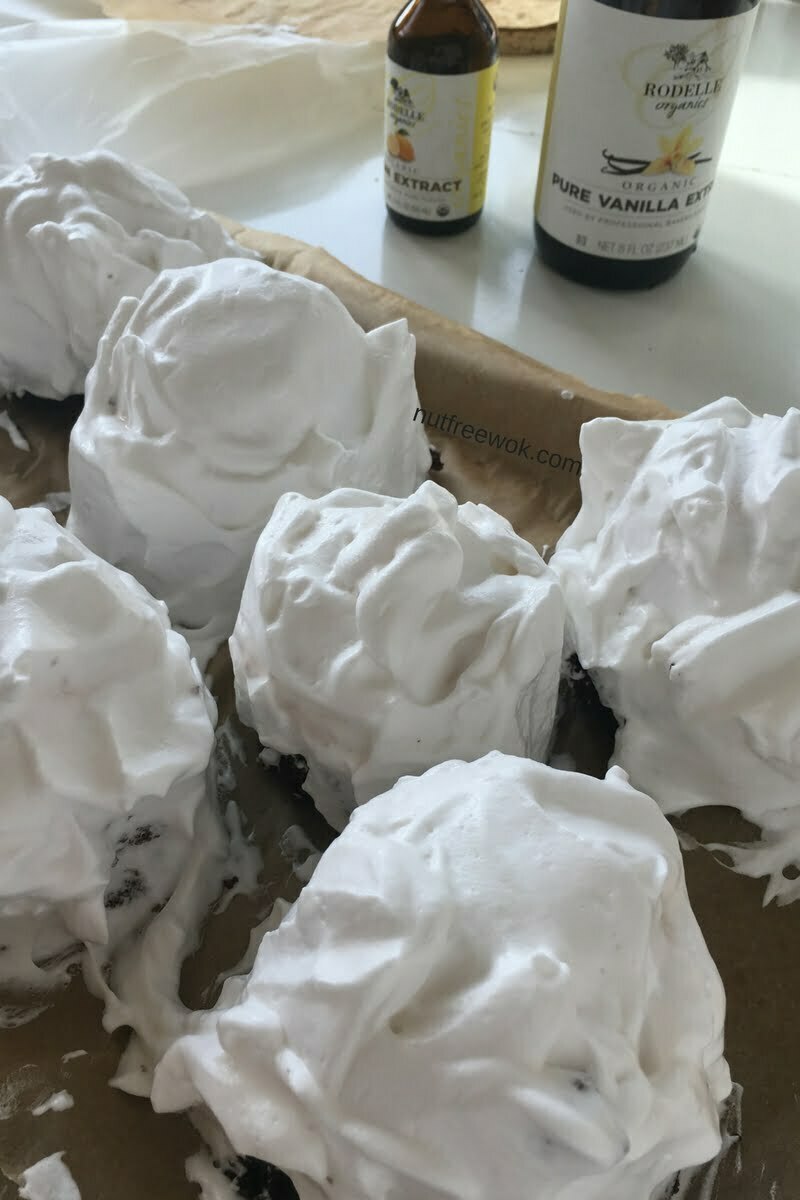
The last assembly step is to make the aquafaba meringue and then spread it all over the ice cream cakes. I find it helpful to refrigerate the can of chickpeas because I noticed that whipping the aquafaba for 10 minutes warms it up and melts the ice cream slightly.
Then strain the bean juice into your mixer bowl for a few minutes to get all the liquid from the can and the beans. I place a strainer over the mixer bowl and pour the can of chickpeas into the strainer and come back to it 5 minutes later.
Use an electric mixer to whip the chickpea liquid until it’s white and fluffy. I don’t want to taste the beans and so it’s necessary to add powdered sugar and extracts to mask the flavor. I use Rodelle Vanilla and Rodelle Lemon extracts (affiliate link) because their flavors are so good. I also add cream of tartar to stabilize the airy meringue and whip for a few more minutes. When the aquafaba is stiff and holds its shape, then it’s ready.
Scoop about 1/2 cup of aquafaba (1/2 of a tennis ball sized amount) on top of the ice cream cake and use an offset spatula to spread it down. Work quickly and have someone help you so you can lightly wrap the tray and return it back to the freezer ASAP.
I recommend that if it’s your first time making aquafaba baked Alaskas, work in small batches. You can assemble 12 cakes with a scoop of ice cream but just pull out a few (2-4) at a time to serve. Once you get the hang of it, then you could do the entire tray at the same time.
Make Ahead Options
You could start this recipe in the morning and finish it by evening as each step is very simple but there’s a lot of waiting times for the cake to bake and cool, and for the various layers to freeze.
If you’re like me, busy and in and out of the house all day long, this recipe is great because you have hands on time for short amounts of time and lots of in between times to do other things.
You could also assemble the ice cream cakes a day before you want to serve them. I recommend that once you top them with aquafaba, freeze the cakes for 1-2 hours and then bake/broil/torch them ASAP and then eat and enjoy.
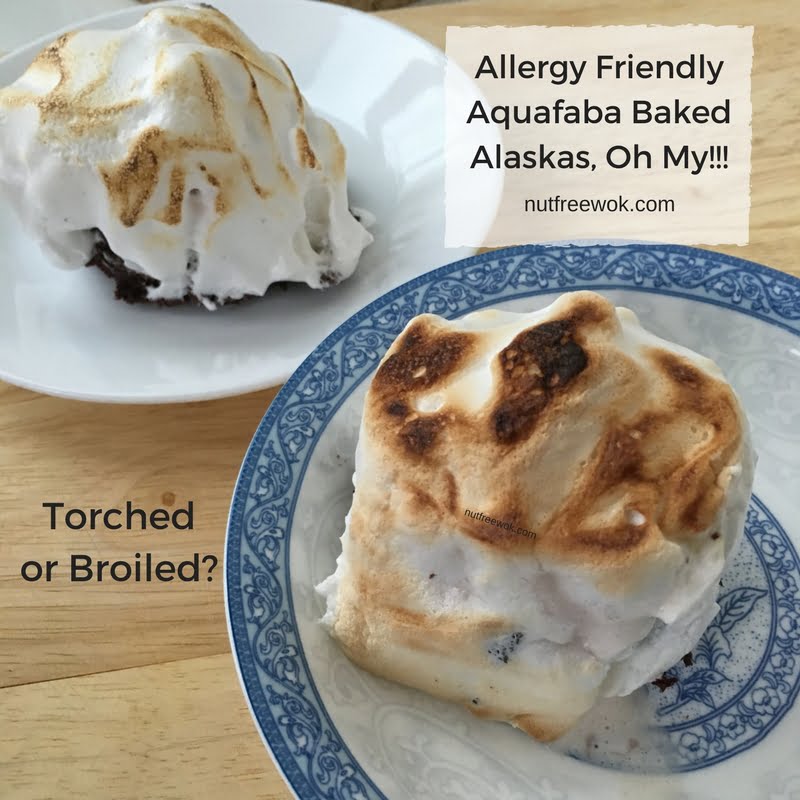
Bake, Broil, or Torch?
If you make a full sized baked Alaska it goes on the lower shelf of a hot oven for 8 minutes which too long for these tiny aquafaba baked Alaskas. I tried three different ways to brown the aquafaba baked Alaska for the final touch.
Bake: Bake these individual aquafaba baked Alaskas at 450°F for 4-5 minutes. Watch them carefully and take them out as soon as the meringue browns around the edges. The aquafaba layer was warm and creamy, the ice cream is soft and slightly melted, and the cake is soft and slightly warmed, my kids’ favorite. This is the best way to brown a large batch all at the same time.
Broil: Set your oven rack so that the tops of the dessert will be at least 4 inches away from the broiler element. Take your ice cream cakes out so they can thaw slightly and preheat your broiler for 3 minutes. Place the tray of ice cream cakes into the oven and with the door open, watch them brown for 60-90 seconds until nicely browned and toasted. Have your oven mitts on because the aquafaba baked Alaskas can go from perfect in a matter of seconds. This way works when you want a more dramatic appearance, the cake might still be a bit cold but not frozen.
Torch: Take your aquafaba covered ice cream cakes out and then use your torch to brown the aquafaba. This method is the prettiest but because it takes the longest amount of time since you’re browning them one at a time, I recommend that you torch only 4 at a time. You could also use a kitchen torch to touch up any spots after the aquafaba baked Alaskas come out of the oven, but be mindful about taking too long to serve the aquafaba baked Alaska before the ice cream melts.
My husband was happy to buy a torch (affiliate) for me to use and was enthusiastic about setting it up for me and torching the aquafaba baked Alaskas. It was easy to use and I felt safe using it. I think I will be making more desserts to make the most of this awesome kitchen tool. 😉
Pros and Cons of using an Oven to Bake: Almost everyone has an oven and this way is the best way to brown the whole batch at the same time. Baking it also tastes the best, the aquafaba baked Alaskas are warm, cold, and creamy all at the same time. One downside is that you have to work quickly to plate and serve the aquafaba baked Alaska when they come out of the oven.
Pros and Cons of using a Broiler: Almost everyone has a broiler and it’s efficient to brown all of your cute aquafaba baked Alaskas all at once. The downsides are that you have to watch them closely as they can go from perfect to slightly burnt in 5 seconds and that mostly just the tops get browned.
Pros and Cons of using a Kitchen Torch: You have the best control to brown the aquafaba baked Alaskas on the top and around the side. The downside is that you have to work quickly to plate and brown them with a torch one at a time before the ice cream melts.
This recipe as written is free of peanuts, tree nuts, egg, soy, fish, shellfish, and shellfish, with easy adaptions to make it top 9 allergen free.
You could substitute the crazy cake with a gluten free cake of your choice, just be sure to bake it in a 13×9 pan so that your final cake layer is about 1.5 inches. You could also use a dairy-free ice cream that safe for you to make a milk-free aquafaba baked Alaska. If you use both adaptations, then the cake would be free of the top 8 or 9 allergens, depending on what dairy-free ice cream you use.
Allergy Friendly Aquafaba Baked Alaskas
Oh yes, aquafaba baked Alaskas are egg free, nut free, and allergy friendly thanks to some miracle bean juice whipped into a cloudlike meringue!
Ingredients
- 1 13×9 chocolate wacky cake
- 6 cups strawberry ice cream store-bought or homemade
- 1 can garbanzo or white bean no salt preferred, refrigerate, reserve beans for other uses
- 3/4 cup powdered sugar
- 1 teaspoon Rodelle vanilla extract
- 2 teaspoons Rodelle lemon extract or lemon juice
- 1 teaspoon cream of tartar
Instructions
-
Cut the cake into 12 squares, brush off the crumbs, and place on a parchment lined baking tray.
-
Wrap the baking tray with plastic wrap and freeze the tray for at least 1-2 hours until the cakes are cold.
-
Add one rounded scoop of ice cream on top of the frozen cakes and gently press into the cake so that the ice cream doesn’t slide off.
-
Wrap the baking tray again and freeze the ice cream cakes for at least 1-2 hours until frozen solid.
-
Set a strainer over a large mixing bowl and pour the can of beans into the strainer, allow the bean juice to drain for a few minutes and set aside the beans for another use.
-
Use an electric mixer to whip the bean juice on high for about 8-10 minutes until it turns into a white stiff meringue.
-
Add powdered sugar, vanilla extract, lemon extract or lemon juice, and cream of tartar, and whip for another minute until stiff.
-
Take the ice cream cakes out of the freezer, spread them out so that you have room in between the cakes to work, and scoop about 1/2 cup of the aquafaba onto each cake and use an offset spatula to spread the aquafaba over the entire ice cream cake. Don’t make the aquafaba smooth as the final dessert looks better with some swirls and texture.
-
Wrap and freeze the aquafaba covered ice cream cakes for 1-2 hours until the aquafaba is frozen.
-
When ready to brown in the oven: preheat the oven at 450°F, place the baking tray on a middle rack for 4-5 minutes. Watch them carefully and take them out as soon as the meringue browns around the edges.
-
OR When ready to brown under a broiler: set your oven rack so that the tops of the dessert will be at least 4 inches away from the broiler element. Take your ice cream cakes out so they can thaw slightly and preheat your broiler for 3 minutes. Place the tray of ice cream cakes into the oven and with the door open, watch them brown for 60-90 seconds with your oven mitts on until the aquafaba baked Alaskas are nicely browned and toasted.
-
OR When ready to use a torch: Take aquafaba covered ice cream cakes out of the freezer and then use your torch to brown the aquafaba. I recommend working in small batches, transfer 2-4 aquafaba covered ice cream cakes onto your dessert plates, and returning the rest into the freezer until you're ready for your next batch.
Recipe Notes
You can further adapt this recipe to be free of the top 8 or 9 allergens by making a gluten free, top 9 allergen free cake in a 13×9 baking dish and using a dairy free, allergy safe frozen scoopable dessert.
Link to chocolate cake recipe: https://nutfreewok.com/chocolate-wacky-cake/
Link to no churn strawberry ice cream recipe: https://nutfreewok.com/strawberry-ice-cream-no-churn/
Thanks for reading, please help Nut Free Wok!
If you like this post or recipe, please be sure to give a 5 star rating, leave a comment, and share this post! Your support means a lot to me.
Subscribe to Nut Free Wok’s email subscription (be sure to respond to the confirmation email). You will be notified by email next time I publish another post or recipe and I won’t send you spam or share your email address with anyone.
Disclosure/Disclaimer:
I may mention the names of stores and/or brand names of products that I use because readers ask and I share products and sources which I use and think may be helpful to readers, all opinions are my own. Please note that manufacturing practices and ingredients can change at anytime without notice and readers are always responsible for assuring allergen safety before buying or consuming foods. NutFreeWok.com is a participant in the Amazon Services LLC Associates Program, an affiliate advertising program designed to provide a means for sites to earn advertising fees by advertising and linking to Amazon.com. Thank you for reading!
Sign Up for Emails from Nut Free Wok!
The best way to see every post or recipe is to subscribe to Nut Free Wok’s email subscription (be sure to respond to the confirmation email). I won’t send you spam or share your email address with anyone.
Disclosure/Disclaimer:
I may mention the names of stores and/or brand names of products that I use because readers ask and I share products and sources which I use and think may be helpful to readers, all opinions are my own. Please note that manufacturing practices and ingredients can change at anytime without notice and readers are always responsible for assuring allergen safety before buying or consuming foods. NutFreeWok.com is a participant in the Amazon Services LLC Associates Program, an affiliate advertising program designed to provide a means for sites to earn advertising fees by advertising and linking to Amazon.com. Thank you for your support!


This is fantastic, Sharon! I love all the tips you’ve included!
Thank you Kelly!
I love that they are single servings. I couldn’t imagine trying to cut a massive cake without getting super messy and the fact that not every piece would be perfect would bug me 😛
Thank you Kortney! It’s also easier to enjoy them over time. I make a dozen, serve as many as we need for a party and then we can enjoy the rest another day. 😉
I’ve never had baked alaskas. This made me wonder if it normally had nuts in it, but it looks like it didn’t have to. Cool to see it without the egg though, so my son could enjoy!
That’s right, it’s not a nut-containing recipe but if you make it yourself, you can be sure it’s free from cross-contact, plus egg-free w/the aquafaba!